IMPORTANT: Be sure to read this safety information. Make sure that everyone who services tires or vehicles in your outlet has read and understands these warnings. SERIOUS INJURY OR DEATH CAN RESULT FROM FAILURE TO FOLLOW SAFETY WARNINGS.
No matter how well any tire is constructed, punctures, impact damage, improper inflation, improper maintenance, or service factors may cause serious tire failure creating a risk of property damage and serious or fatal injury to you and/or your customer.
Encourage your customers to examine their tires frequently for snags, bulges, excessive treadwear, separations, or cuts. If such conditions appear, advise them to demount the tire, use the spare, and see you immediately. If you spot any of the above conditions bring them to the customer’s attention Immediately. For safety, comply with the following warnings.
Tire and rim servicing can be dangerous and must be done only by trained personnel using proper tools and procedures. Failure to read and comply with all procedures may result in serious injury or death to you or others.
Reinflation of any type of tire/rim assembly that has been operated in a run-flat or underinflated condition (8O% or less of recommended pressure) can result In injury or death. The tire may be damaged on the inside and can explode while you are adding air. The rim parts may be worn, damaged or dislodged and can explosively separate.
Use of starting fluid, ether, gasoline, or any other flammable material to lubricate, seal, or seat the beads of a tubeless tire can cause the tire to explode or can cause the explosive separation of the tire rim assembly resulting in serious injury or death. The use of any flammable material during tire servicing is absolutely prohibited.
Any inflated tire mounted on a rim contains explosive energy. The use of damaged, mismatched, or improperly assembled tire/rim pads can cause the assembly to burst apart with explosive force. If you are struck by an exploding tire, rim part, or the air blast, you can be seriously injured or killed.
Re-assembly and the inflation of mismatched parts can result in serious injury or death. Just because parts come in together does not mean that they belong together. Check for proper matching on rim pans before putting any pads together.
Mismatching tire and rim diameters is dangerous. A mismatched tire and rim assembly may explode and can result in serious injury or death. This warning applies to 14″, 14.5″, 16″, and 15.5″ tires and rims as well as similarly mismatched size combinations. Never assemble a tire and rim unless you have identified and correctly matched the parts.
If the tire is below the recommended operating pressure, it must be considered flat. The tire must be removed, dismounted, and inspected for punctures or other damage.
-
A tire cannot perform properly unless it is mounted properly on the correct size rim or wheel. The following are general instructions for demounting and mounting tube-type and tubeless tires. For detailed instructions on mounting and demounting truck tires on particular types of rims and wheels, refer to the instructions on the rim and wheel manufacturer or the US Tire Manufacturers Association (USTMA) wall charts.
1. SELECTION OF PROPER COMPONENTS AND MATERIALS:
- All tires must be mounted with the proper tube and flap (if required) and rim or wheel as indicated in the application data books.
- Make certain that rim/wheel components are properly matched and of the correct dimensions for the tire.
- Always fit the new tube in a new mounting. Since the tube will exhibit growth in size through normal use, an old tube used in a new mounting increases the possibility of tube creasing and chafing, possibly resulting in failure.
- Always install a new flap in a new mounting. A flap through extended use becomes hard and brittle. After limited time, it will develop a set to match the tire and rim in which it is fitted. Therefore, it will not exactly match a tire/rim combination.
- Always install new valve cores, and metal or hard plastic valve caps containing plastic or rubber seals. On tubeless truck tire valve seams, replace the rubber grommet. For tires requiring ‘O’Rings, be sure to install a new one at every tire change.
- Always use a safety device such as an inflation cage or other OSHA-approved device when inflating.
- Never stand over the tire or in front of a tire when inflating.
- Always use a clip-on valve chuck with hose extension and stand to the side when inflating.
2. TIRE AND RIM LUBRICATION:
It is essential that an approved vegetable oil base soap solution tire lubricant be used for mourning tubeless and tube-type tires. The lubricant serves the following purposes:
- Minimizes the possibility of damage to the tire beads from the mounting tools.
- Eases the insertion of the tire onto the rim by lubricating all contacting surfaces.
- Assists proper bead seating (tire/rim centering) and helps prevent eccentric mountings.
- a)TUBELESS TIRES – Apply lubricant to all surfaces of the bead area of the tire. When applying lubricant to the rim, lubricate the entire rim surface from flange to flange.
- b) TUBE-TYPE TIRES – Apply clean lubricant to all portions of the tire bead area and the exposed portion of the flap using sufficient but sparing quantities of lubricant. Also lubricate the entire rim surface. Avoid using excessive amounts of lubricant which can become trapped between the tire and tube can resulting in tube damage and rapid air loss.
CAUTION: It is important that tire lubricant be clean and free of dirt, sand, metal shavings or other hard particles. The particles may lodge between the tube and the flap edges, resulting in splits in the tube. The following practice is recommended:
- Use a fresh supply of tire lubricant each day, drawing from a clean supply and placing the lubricant in a clean portable container.
- Provide a cover for the portable container and/or other means to prevent contamination of the lubricant when not in use.
The following method is suggested, which has proven to be successful in minimizing contamination and preventing excess lubricant from entering the tire casing: Provide a special cover for the portable container that has a funnel-like device attached. The small opening of the funnel should be sized so that when a swab is inserted through the opening into the reserved of lubricant and then withdrawn, the swab is compressed, removing excess lubricant. This allows the cover to be left in place, providing added protection. A mesh false bottom in the container is a further safeguard against contaminants. The tire should be mounted and inflated promptly before lubricant dries.
3. PREPARATION OF WHEELS, RIMS, AND TIRES:
Never weld or apply heat to a rim or wheel on which a tire is mounted.
- Always wear safety goggles or face shields when buffing or grinding rims or wheels.
- Inspect wheel/rim assemblies for cracks, distortion, deforming of flanges, side rings, lock rings, etc. Using a file and/or emery cloth, smooth all burrs, welds, dents, etc. that are present on the tire side of the rim. Inspect the condition of bolt holes on the wheels.
- Remove rust with a wire brush and apply rust inhibiting paint.
- Remove any accumulation of rubber or grease which might be stuck to the tire, being careful not to damage it. Wipe the beads down with a dry rag.
- Make sure there is no water, dirt or foreign material inside the tire before inserting the tube.
-
- ALWAYS comply with the procedures in the tire/wheel manufacturer’s catalogs, instruction manuals or other industry and government materials.
- Before loosening any nuts or clamps that attach a tube-type tire/rim assembly to a vehicle, ALWAYS completely deflate the tire (or both tires of a dual assembly) by taking out the valve core(s).
- Use a non-flammable vegetable or soap based rubber lubricant on the beads and rim surfaces to make tire demounting and mounting easier.
- Use proper tools to demount or mount tires and rims (refer to “Typical Tire Service Tools”). NEVER use a steel hammer to seat rim components – use only rubber, plastic or brass-tipped mallets. Striking a rim/wheel assembly with a hard-faced hammer can damage the components and endanger the installer. Use a steel duck bill hammer only as a wedge to unseat the beads of tube-type tires. NEVER strike the tire/wheel assembly with a steel duck bill hammer to unseat the beads and do not strike the head of the duck bill hammer with another hard-faced hammer—use a rubber mallet or plastic dead blow hammer. Slide impact tools and hydraulic bead unseating tools can also be used to unseat beads on tube-type tires.
- NEVER inflate any tire that has been operated in a run flat or underinflated condition (i.e. operated at 80% or less of recommended operating pressure). Demount, inspect and match all tire and rim components before reinflating in a restraining device with the valve core removed.
-
TIRE AND RIM SERVICING CAN BE DANGEROUS AND MUST ONLY BE PERFORMED BY TRAINED PERSONNEL USING PROPER PROCEDURES AND TOOLS. FAILURE TO READ AND COMPLY WITH ALL OF THESE PROCEDURES MAY RESULT IN SERIOUS INJURY OR DEATH TO YOU AND OTHERS.
- NEVER use starter fluid, ether, gasoline, or other flammable materials and/or accelerants to lubricate or to seat the beads of a tire. This practice can cause the explosive separation of the tire/ wheel during servicing or during highway use, which may result in serious injury or death.
- ALWAYS inflate the tire rim/wheel assembly in a restraining device with the valve core removed. The air line assembly must consist of the following components: a clip-on air chuck, an in-line valve with a pressure gauge or presettable regulator, and sufficient hose length to keep the technician outside the trajectory during inflation. (See ‘Trajectory’ WARNING below). DO NOT rest or lean any part of your body against the restraining device during inflation. Failure to use a restraining device when inflating a tire/rim wheel assembly is not only a violation of OSHA regulation 1910.177, but also a DANGEROUS PRACTICE that may result in serious injury or death. During inflation, if ANY sidewall undulations or bulges appear or if ANY snapping or cracking or popping noises occur – STOP! DO NOT approach tire. Before removing from restraining device, completely deflate tire remotely. Remove clip-on air chuck. Mark tire as damaged for potential “zipper rupture”. Render tire unserviceable, non-repairable, and scrap.
- NEVER inflate beyond 40 psi to seat any tire beads. NEVER stand, lean, or reach over the tire rim/wheel assembly in the restraining device during inflation. Even if a tire is in a restraining device, inflating beyond 40 psi when trying to seat the beads is a DANGEROUS PRACTICE that may break a tire bead or rim/wheel with explosive force and possibly result in serious injury or death. Demount, inspect, and match all tire and rim components before reinflating in a restraining device with the valve core removed.
-
Tires on certain globalized (“Euro”) Vans
There has been an increase in the variety of vans sold in the North American market that are based on platforms used around the world by vehicle manufacturers. These vans are commonly used in commercial service and come in various sizes and configurations with efficiency and cargo flexibility in mind.
This Tire Information Service Bulletin is a reminder about proper tire replacement guidelines, particularly as it applies to globalized (“Euro”) vans and the differences in tire size designations that may be applied to them.
NOTE:
Before replacing tires, always refer to and follow the vehicle manufacturer’s tire replacement recommendations and restrictions.Like all other vehicles, when considering tire replacement for Euro vans, carefully determine the tire size designation for the original equipment tires and the recommended replacement tires as specified on the vehicle tire placard, certification label or in the vehicle owner’s manual. Depending on the van and it’s
configuration, it may be equipped with P-Metric, LT-Metric, European Metric (Passenger), or European Commercial Metric tires.Figures 1 and 2 are examples of placards from one of these increasingly popular model vans. These placards show that European C-Type tires are specified (note the “C” at the end of the tire size code).

Figure 1: Example Vehicle Certification Label
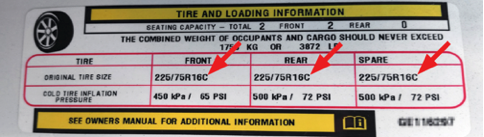
Figure 2: Example Vehicle Tire Placard
Tires with different size designations may not be interchangeable even if they have similar dimensions. For example, an LT metric tire may not be a suitable replacement for a C-Type European Commercial Metric tire, even if the tires have similar section width, aspect ratio, and rim codes. Such tires typically have significantly different load carrying capacities. In other words: An LT225/75R16 is not the same as 225/75R16C.
TIRE TYPE SIZE CODE LOAD INDEX & SPEED SYMBOL LOAD IDENTIFICATION MAXIMUM LOAD CAPACITY AT RATED PRESSURE P-Metric (Passenger) P225/75R16 104T Standard Load 900 kg, 240 kPa European Metric (Passenger) 225/75R16 104T Standard Load 900 kg, 250 kPa LT-Metric (Light Truck) LT225/75R16 115/112R Load Range E 1215/1120 kg, 550 kPa C-Type European Commercial Metric 225/75R16C 121/120R Load Range E 1450/1400 kg, 575 kPa NOTE:
The “C” at the end of the size designation in Figure 3 below identifies the tire as C-Type European Commercial Metric tire. The “C” is not a load range. The load range is marked separately on the tire sidewall as shown in figure 4.

FIGURE 3: Size and service description of an example C-Type European Commercial Metric Tire

FIGURE 4: Load range, max load and pressure specifications for the example tire shown in Figure 3